Welcome to Hellion! This page is a resource to help guide new players throughout their first few days of Hellion, and will teach you how to do every aspect of the game by yourself!
Intro To Story[ | ]
Hellion is a solar system 1700 light-years from Earth. Hellion is the destination of the first interstellar colonization mission of the 23rd century. A million colonists, suspended in cryogenic hibernation, wake up a century later and find themselves trapped in a nightmare. Instead of grand habitats and planets waiting to receive new settlers, there is only evidence of devastation and conflict everywhere with ruins, debris fields and empty stations. With no trace of UN officials, corporate representatives, engineers, scientists or law enforcement troops, and a rescue operation over half a century away, colonists turn to scavenging, stealing and outright violence. Others try to live in a more civilized way and begin uncovering the truth behind the largest disaster in human history.
Dealing With Bugs[ | ]
Unfortunately, bugs are quite commonplace in Hellion, because it is a cancelled early access game, the developers are putting no effort into fixing them. When something strange occurs to you, such as an object randomly falling, or something happening that you know wasn't part of the game, file a bug report in the discord, but most importantly RELOG. Logging out and logging back in fixes almost all bugs, and this solves many problems, and so I say, WHEN IN DOUBT, RELOG!
Step 1: A Fresh Start[ | ]
You just woke up on a falling station that is destined to crash very soon. What a predicament! You get out of your cryopod by pressing F, the interact button. You find a suit on the couch next to the room you were sleeping in, and you go put it on, afterward putting the jetpack, then the helmet on. The quest-line navigates you through this part until you get yourself a rescue ship. Once you get on that ship, follow Theona's instructions to get your ship up and running (Make sure to open the solar panels in the power supply screen). Once you have registered yourself, hop in the cockpit screen and pay attention to the instructions on the left of the screen, they will teach you how to move your ship.
Once you have found your ways with your ship, travel to the Derelict Power Section, and skip the one in the middle (There's no loot). Once you have your first nanite core replaced, you'll be ready for your first warp.
Step 2: First Warp[ | ]
As per Theona's instructions, open up the navigation menu whilst in the pilot seat (2). This will open up what is called your navigation menu, and that helps you visualize your position amongst the stars. In this menu you will see a purple planet, this planet is the starting planet, aka Bethyr. This is where you will spend most of your beginner time, and most likely where your home base will be. You need to look for a station called either Fabricator, Haven, Airlock, or steropes wreckage. Once you find this point on the map, left click on it to see its orbital details. You will see a "warp to" button in the bottom right side of the small screen, and click on that. You can learn more about the warp system here.
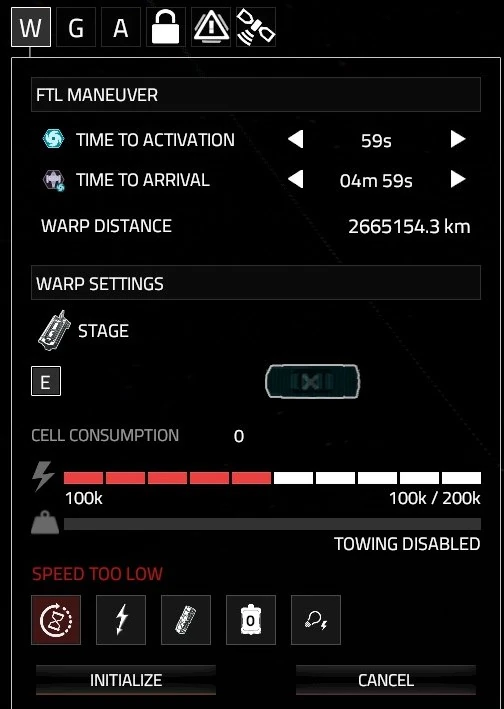
The Warp Screen
You will be directed to this screen. This is your warp screen, possibly the most important one in the game. In order to execute something called a warp maneuver, you must adjust the activation and arrival times to make the indicator read "ready". You can use the mouse wheel to scroll past the time. If the indicator reads "speed too low" increase the time to arrival by scrolling upwards, and vice versa if it reads "speed too high".
Once it says "ready", press initialize to begin the countdown to warp. Press tab to exit this screen without cancelling warp.
Wait for the countdown to complete and you'll begin warp. Your first warp should take quite a few minutes, so get up and walk around your ship to get to know it.
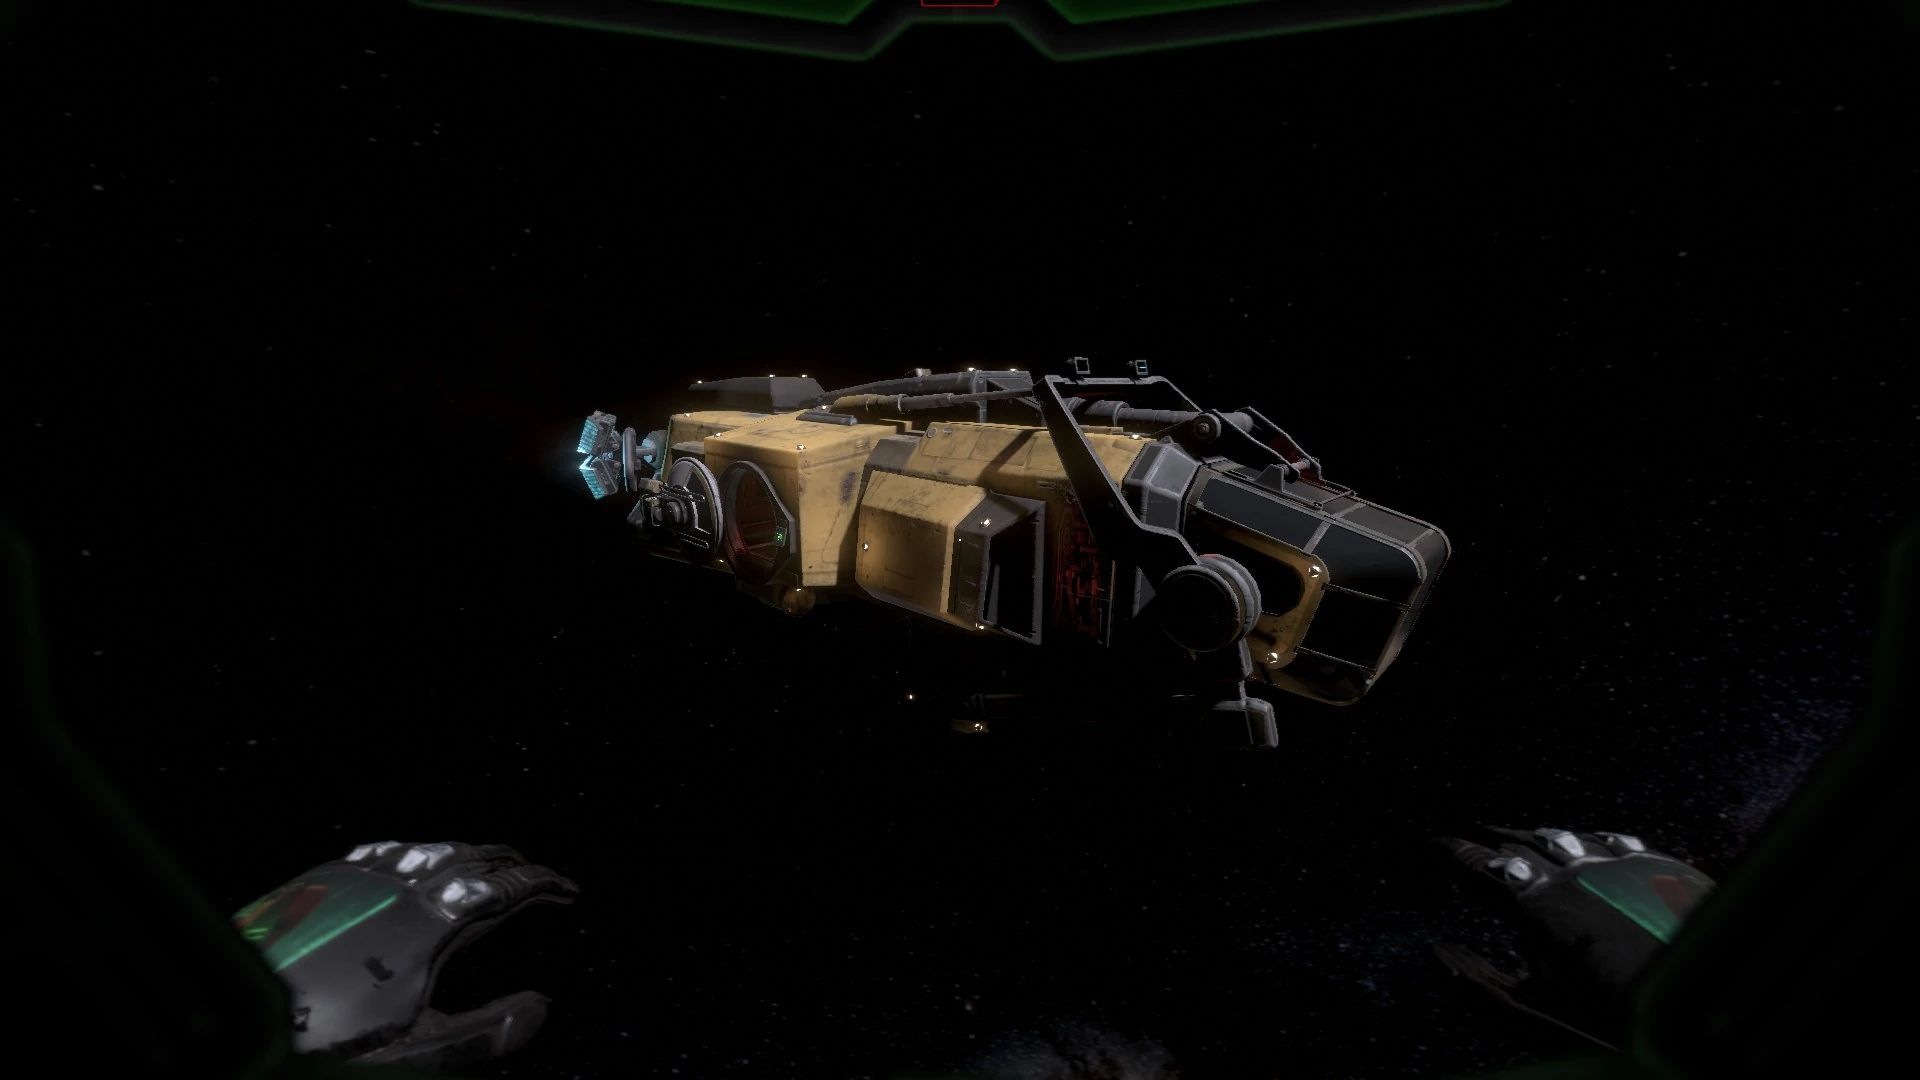
The Steropes
You are currently travelling in one of two ships, the Steropes. The steropes is a rescue type tug ship, meant for construction and not meant to be used commercially in the world of Hellion, but it's all you got right now, so it'll have to do. This ship has 5 main sections, the cockpit, the storage area, the airlock prep room, the engineering room, and the airlock. The cockpit contains the authorization panel, a personal armory, and the pilot seat. The storage area, as you can guess, contains storage for when you go looting around modules. The airlock prep room contains suit racks and emergency supply cupboards that you can store stimpacks and canisters in. The engineering room contains almost all of your ship's systems. It contains the life support panel, the power supply panel, the air filtration system, the warp cell and singularity cell detonator slot, and the Nanite Core slot, as well as a radar upgrade slot. All of these systems play a key point in your survival.
Finally we have the airlock room, something that I'll mention soon, when we have access to fresh air.
Before you the warp ends, your oxygen might be low, press 4 to grab the O2 canister you picked up in the doomed station, and left click to administer it.
Step 3: Home, Sweet Home[ | ]

Docking To The Fabricator
Now that you have arrived to what seems to be a mess of modules, pay attention to the questline. Travel to the "fabricator" module first. Once you are stable and near the fabricator module, press 3 on the keyboard to open up the docking menu, which you will use to attach your fabricator to your ship. Docking is quite tricky, use the spacebar and ctrl keys to control your height. If you fail once or twice and bump into the module, that's ok, just keep at it until you get it. (Use the scroll wheel to highlight/select the correct target, in this case, the fabricator) Once docked, press 1 on the keyboard to go back to piloting mode. Now that the fabricator is attached, slowly travel to the module called "Haven". This is the main section of your base. Once you get close, open up the docking menu again, and choose one of the ports on the Haven to dock to, with your mouse wheel.

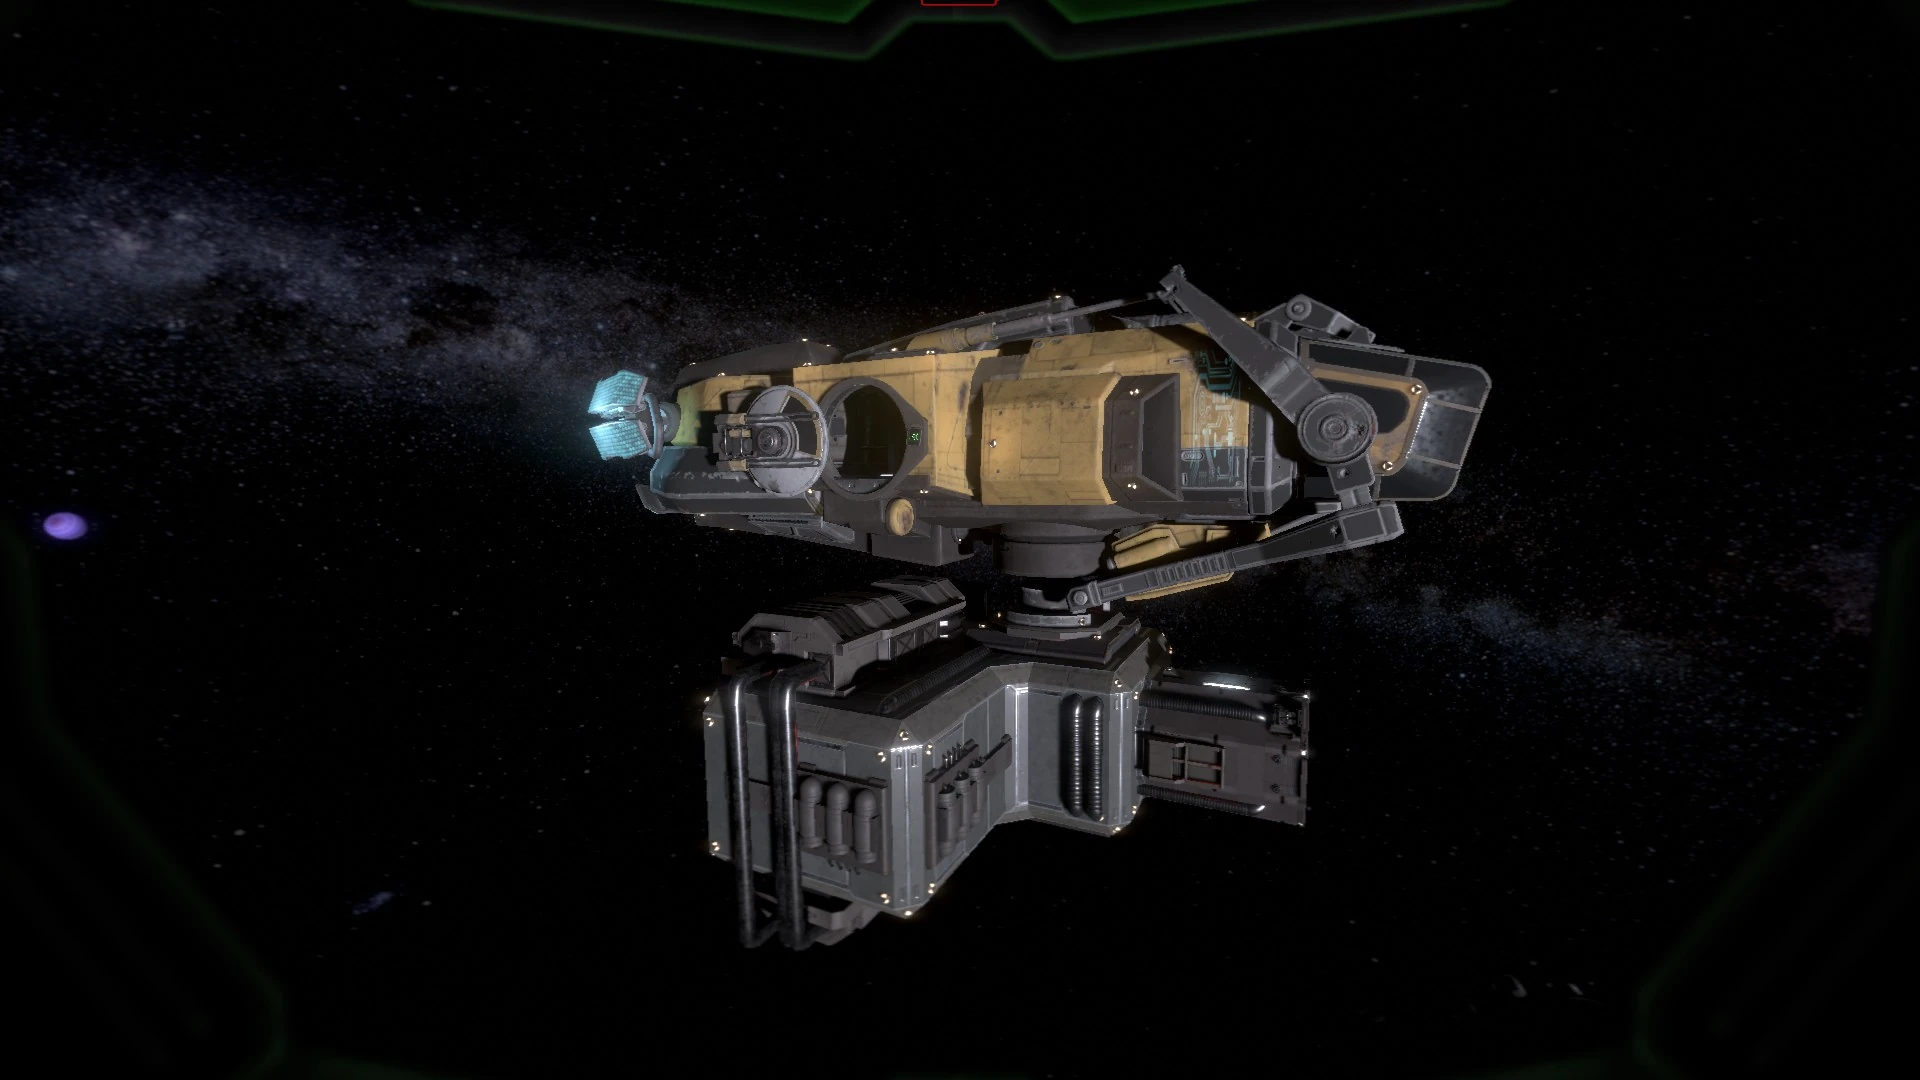
The Steropes Docked With The Fabricator
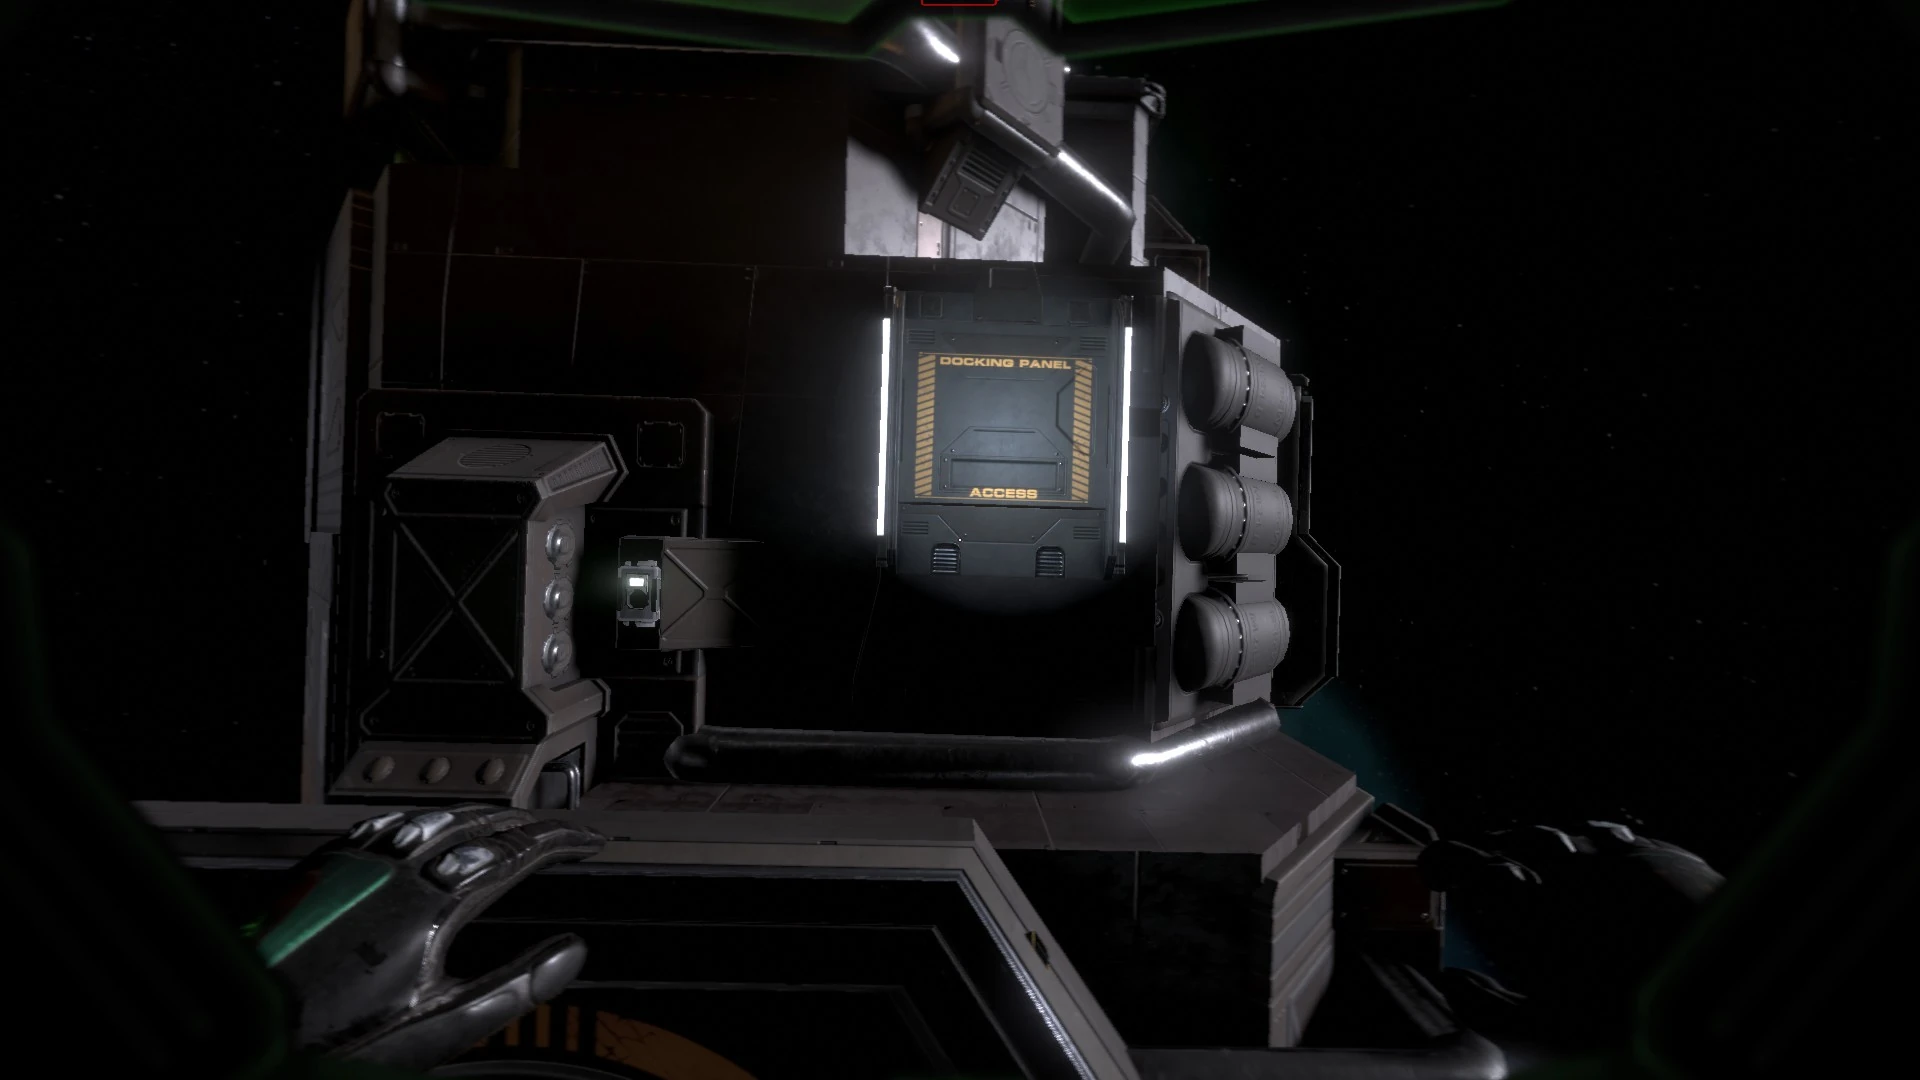
Now that you have docked your fabricator to your Haven, get outside of your ship, and go to the airlock module that is nearby. Once near it, look around the whole airlock structure, and you will find the docking panel. Press F on the cover to open it up, and reveal the screen inside. Press F on the screen to access the docking menu of the airlock. Now dock the airlock to the Haven, the same way you did with the fabricator. Once you do, congratulations! You just made your first starter base.

The Docking Panel atop The Airlock
Before going inside just yet, you might want to see whats going on with that derelict and the steropes wreckage floating near your base. Go inside your ship, and find the docking lever, a lever to the right of the pilot seat, which has a cover on it. Press F to remove the cover, and press F again to release and undock from the station. Proceed to then fly your ship to the steropes wreckage.
Once you are at the steropes wreckage, explore inside the different parts of the ship, and you'll be amazed to find a warp cell, and a singularity cell detonator. Both of these components are part of the warp system, and are used to increase speed and towing power of your vessel. If you go outside the broken steropes and around the back, you'll find a slot that says "RCS system control" and inside there will be a little green lit up circle. Go to it and pick it up. You now have something called a resource injector, which is used to reduce the resources used in a certain process. These are all the things you can pick up from the steropes. You can leave and travel to the derelict floating around.
Once you arrive at the derelict, you'll see that there is no loot inside of it. Circle the outside of the derelict with your player, and you'll see panels that are sticking out of the derelict. Go closer to them and pick them up. These are carbon panels, which can be recycled into carbon fibers, a useful crafting resource. After this, go back to your Haven, and go inside to look at your first home in a new solar system. Follow the questline and set your spawn point.
Step 4: Housework[ | ]
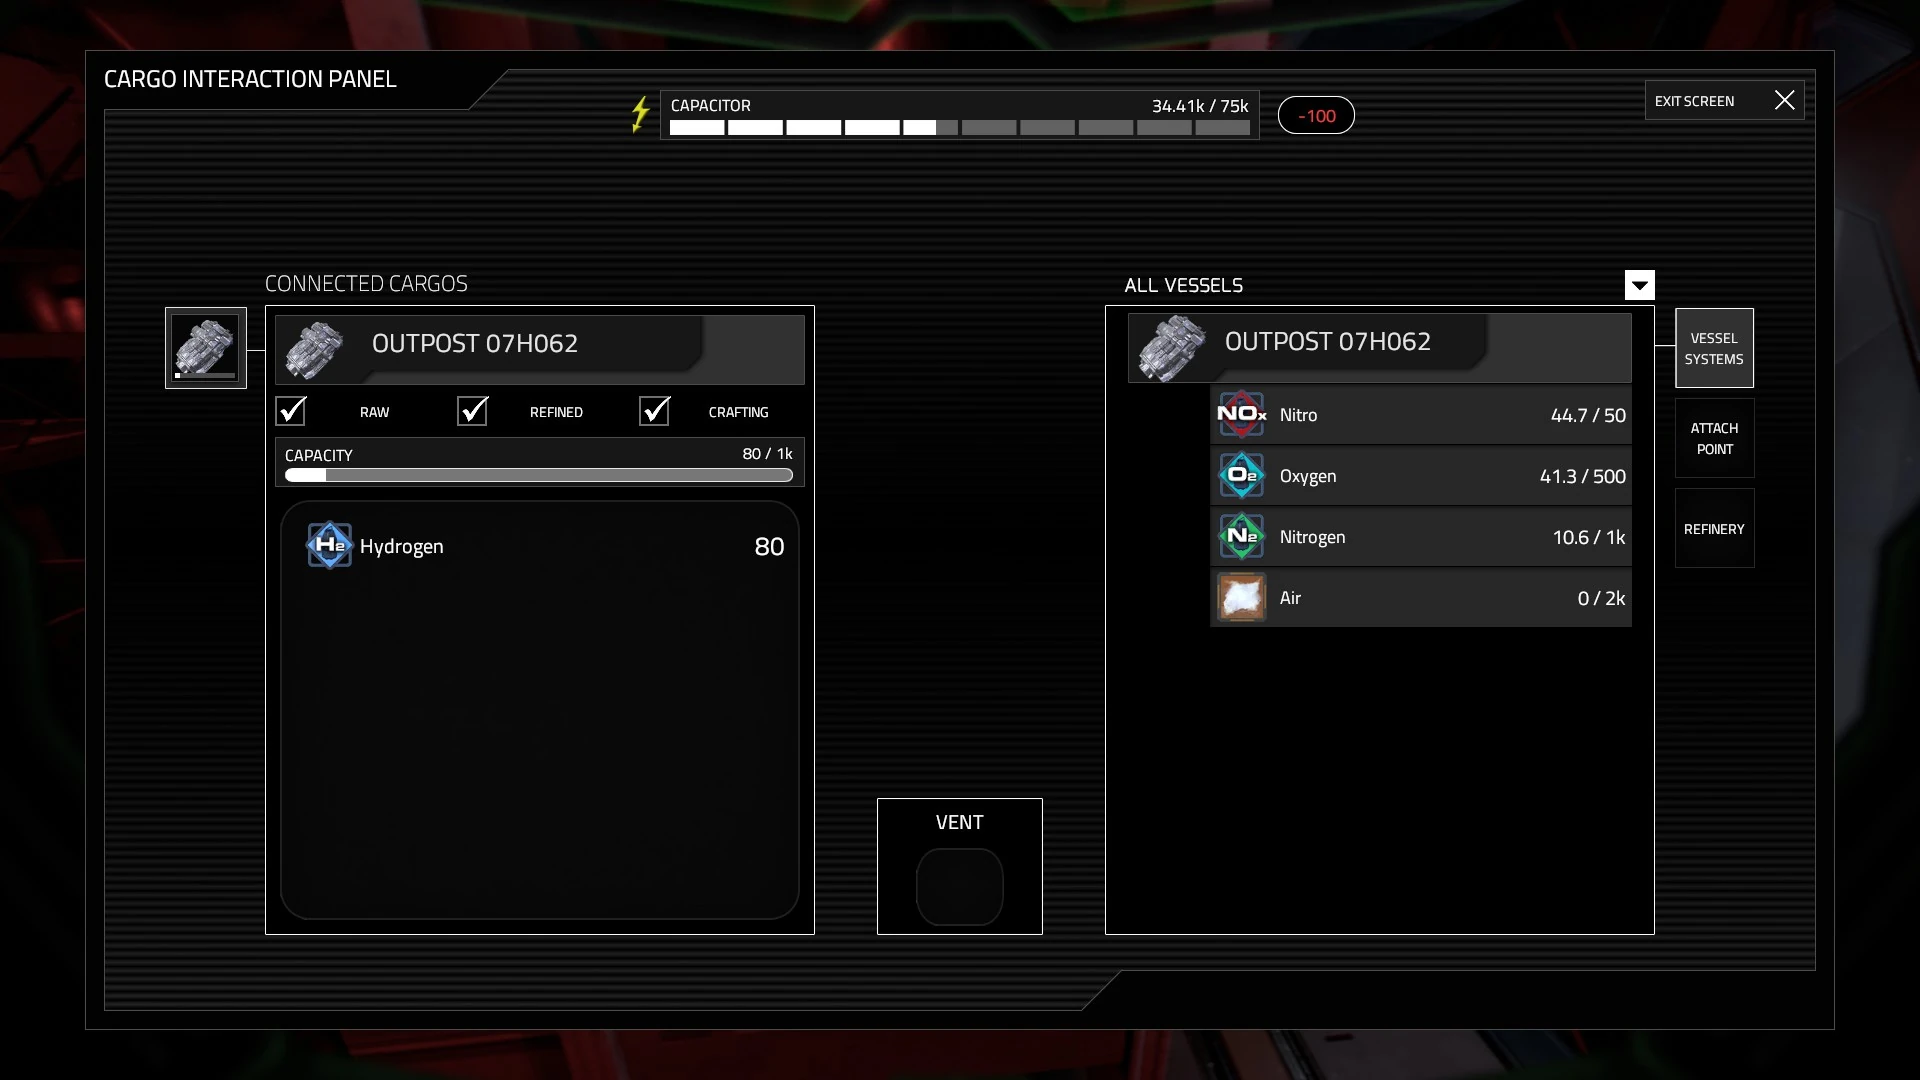
Now that you're inside your brand new Haven, you may see some problems... Everything seems to be dark and broken. This is because the station spawns in a half-dead state, and is unpowered. This is totally normal, so don't panic. Grab the welder as the story instructs you to, and put it in the cargo slot near the cargo interface. Once you put it down, you'll be greeted by a cargo module screen. This cargo interface is what allows you to store, transfer and refill things with the different resources in the game. Once you have opened this cargo interface, you'll see a screen that lists all your vessels and the resources inside them, as well as the connected cargo storage available to you. You attached your welder
The Cargo Interface
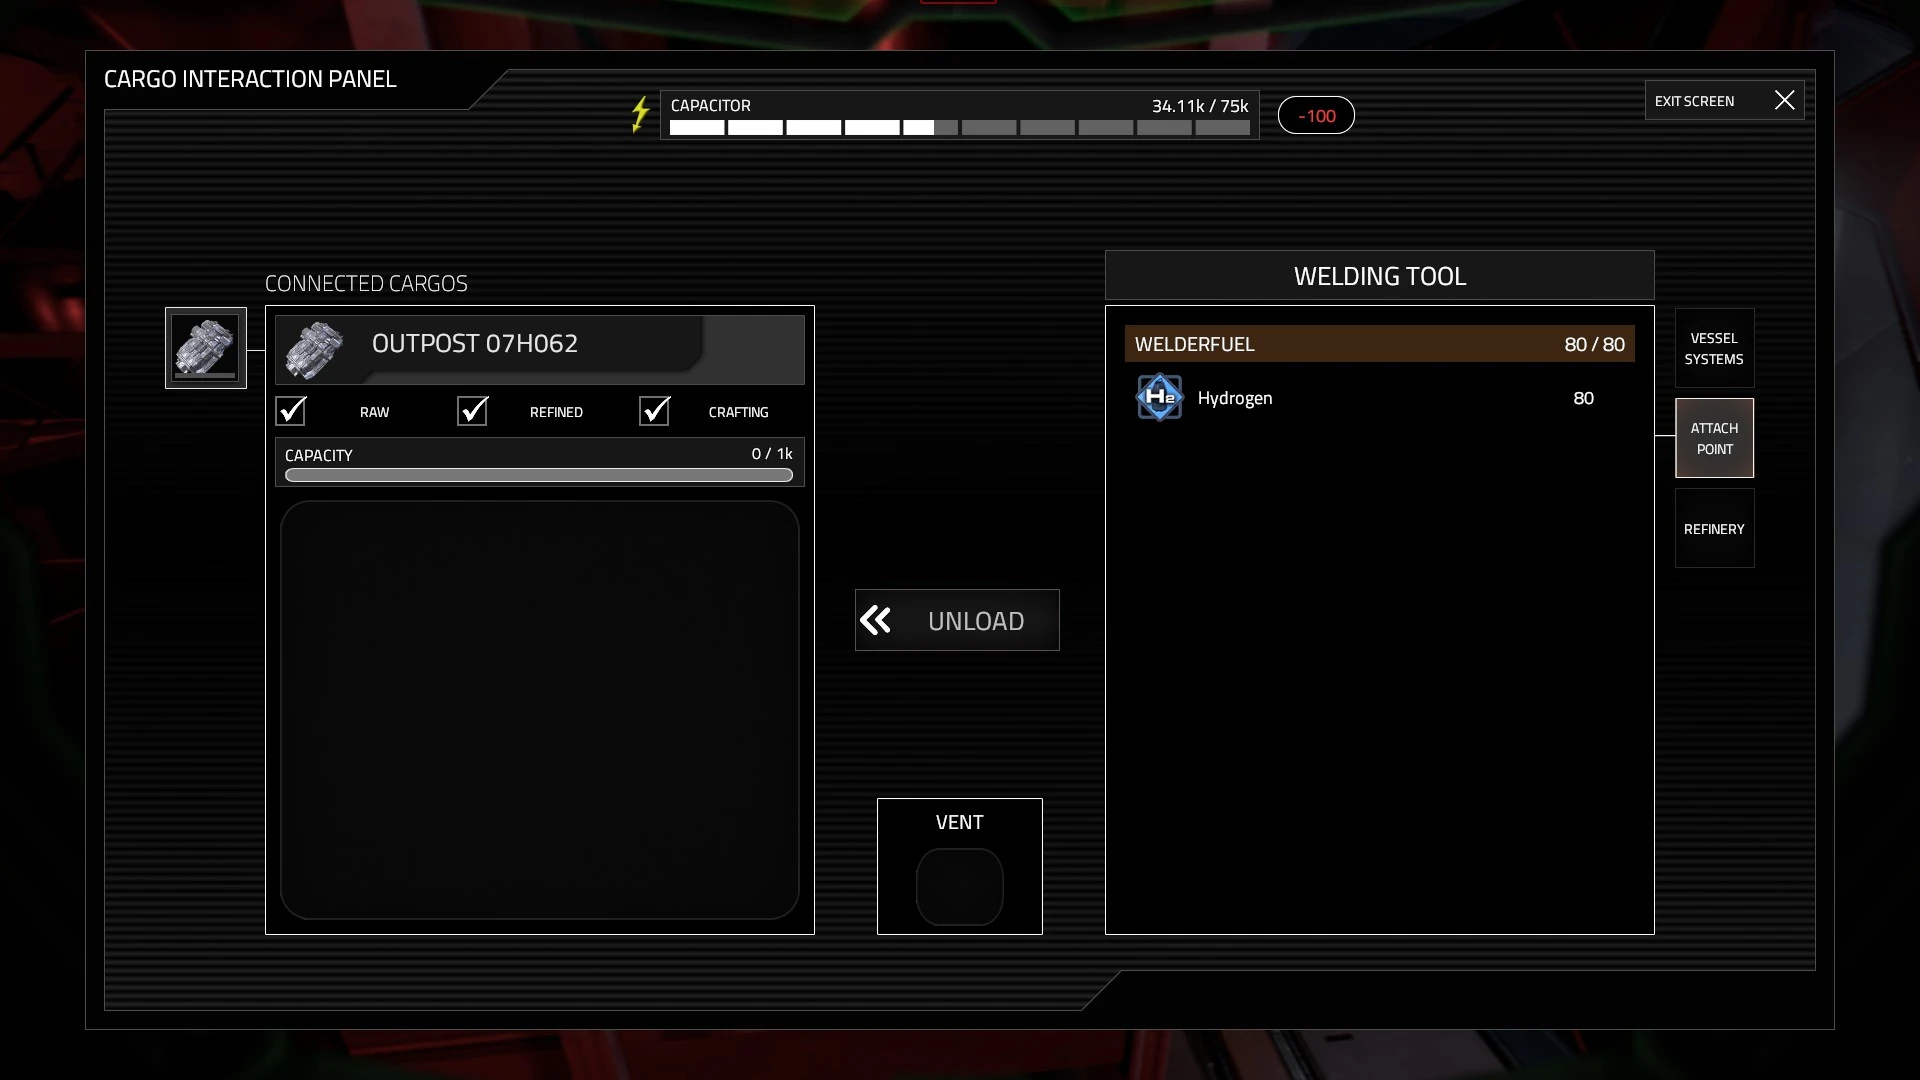
"Attach Point"
to the attach point. On the right of the screen, click on attach point and you'll see your welder fuel slot on the right, and resources on the left. A welder requires fuel, and that fuel is hydrogen in Hellion. Click refill, to fill your welder with fuel, and then proceed to repair parts of your station, both inside and out. Broken pieces of the station are marked with yellow and black wire/destroyed sections. Bring your welder up to them and left click to repair. When the yellow is gone, that section is repaired. Continue to do this until you run out of fuel. But now what?
(TIP: You might want to refill your resource canister with oxygen at the cargo terminal so you can refill your suit as you repair)
Go to the power supply screen in your Haven. On the right side of the screen, there are the different modules you connected, and how much power they each draw. Turn on the Haven's power, by clicking the ON/OFF slider beside the name. Once this is on, your Haven now has power. The bar on top is the capacitor, or basically a big battery, meant to store power for when you don't use it.
Go to the cargo interface section again, and look at the resources you have on the left side. There is a certain resource called "ice". Click on the refinery section in the cargo module on the right side of the screen, this will open up a blank section on the right. Drag the "ice" resource over to the refinery, and when it's in, click "refine". This will start the refining process and your ice will begin to turn into hydrogen and oxygen. You can learn more about resources here.
Once your resources have been refined, press "unload" to load them back into your cargo bay, then "attach point" again with your welder in the slot, and refill it again. This time you shouldn't run out of fuel. Continue repairing your base, both inside and out, until all yellow marks are gone, and there are no warning signs on your helmet HUD. Once this is complete, your base has been fully repaired, powered and is ready for the next step. Make sure to complete the small quest objectives, but IGNORE the "turn on air filter" and "turn on air generator" ones.
Step 5: A Breath Of Fresh Air[ | ]

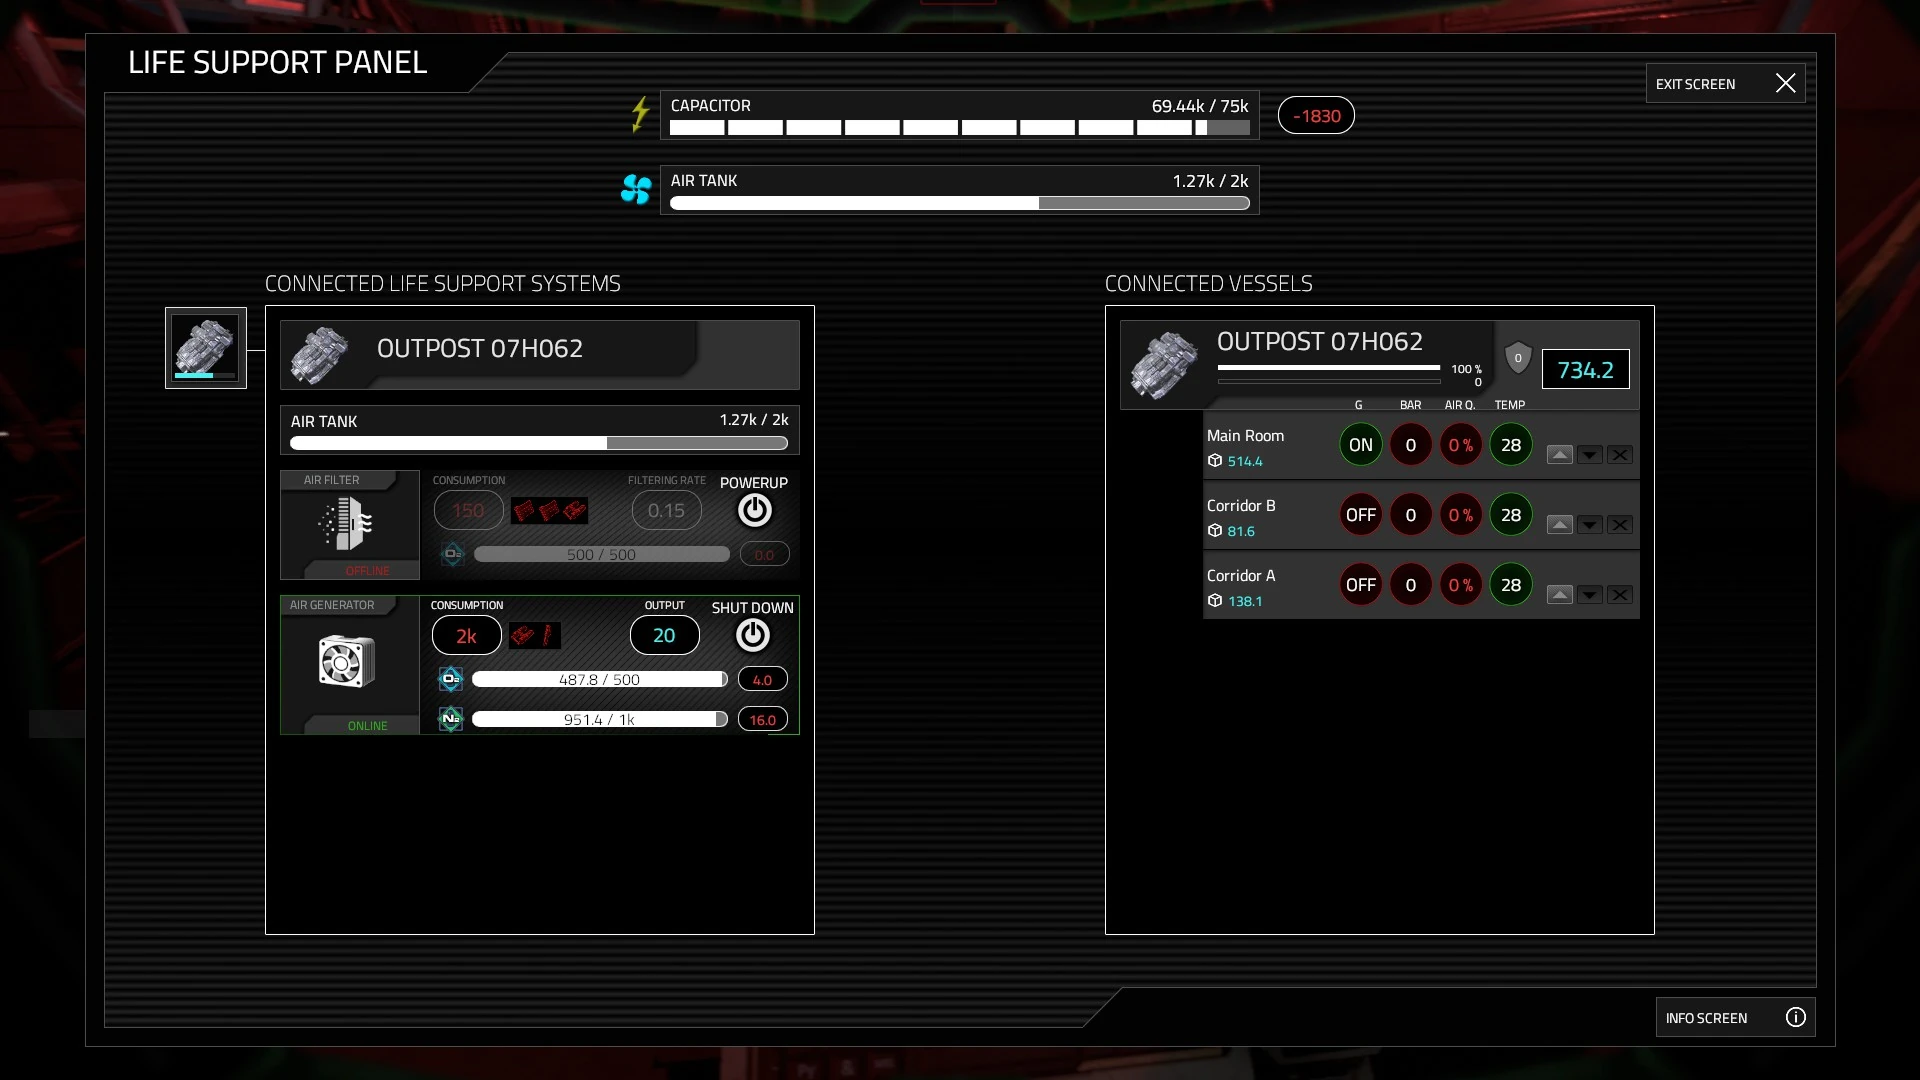
Life Support Screen
Now that everything is repaired, we are ready to begin pressurizing and filling your base up with air. Go back to the cargo interface, and start refining the "nitrate materials" to gain nitrogen for air creation, as well as continue refining the rest of the ice. Once this is done, you should have a good amount of oxygen, and nitrogen available to you. Click on the "vessel systems" section of the interface, and you'll see your Haven's resource slots. Drag to the right all of your nitrogen into the green nitrogen symbol, and drag to the right HALF of your oxygen to the blue oxygen symbol. Once these are loaded in, go to the air generator and take that resource injector that you got from the steropes wreckage, and put it in the air generator slot (the air generator is in the corner). Once this is all completed, go to the life support panel, just across from you. .
Turn on the air generator and let it work, until the air in your air tank stops filling. Whilst it's filling, on the right you will see your modules. Click the up directional arrow to begin pressurizing them with air, and as you begin to do this, you will see the number with the label "bar" rising up. This means the pressure in your base is beginning to rise. You'll begin to see air shooting out from vents above you, and the hissing sound of air coming to life. As soon as the lights turn from red to white, it means the air is breathable, which in turn means you can take off your helmet! WHEW.
(TIP: Before you pressurize, make sure your airlock door is closed)
Once this process is finished, you'll hear the air rushing stop, and that means your air tank is empty. Turn off the air generator, and walk around your newly pressurized, fresh base.
You might encounter that the doors to your fabricator and airlock are blocked and there's a red X in the window. This simply means that there is a difference in pressures between the two rooms. There is a lever on the right that says "manual door over-ride". Pull this lever to release a gust of wind and to open the door to equalize the pressures in your station. Do this for all the doors with red X's, except the outer airlock door. Ahhhhh.... You can relax now, your base is fully pressurized and ready for habitation.
Step 6: Take A Break[ | ]
Now that you've fully repaired, and pressurized your base you can take a break!
Hellion can be frustrating sometimes, and I normally find that taking an hour break or so helps me calm down from the fiery destruction my base exploded in. Just kiddin (:
A break is sometimes good in a game, especially one as intense as Hellion. After you have done these previous steps, your base is fairly self-sustainable now, which mean you can go to sleep in your cryopod for a bit, or maybe even a day if you want.
Just make sure not to go AFK or stand around outside of a cryopod, as this uses up air quality, and might suffocate your character. Maybe recharge the battery in your helmet, refill your jetpack etc... Just relax.
Step 7: Airlocks, Fabricators and Moon Cheese[ | ]
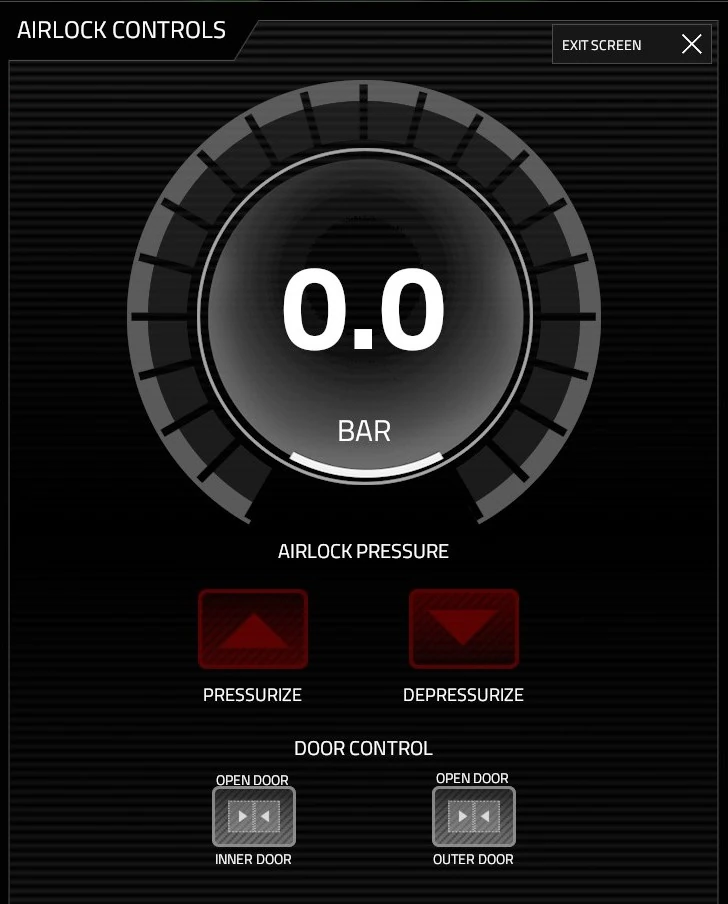

The Airlock Interface
After the nice break you've had, it's time to get familiar with your base systems and how they work. Go into your fabricator, and you'll see a couple things. On your right there are storage racks, toward the back there are suit slots, and then there's these three weird things that you haven't seen before. On your left, there's a box looking thing. That's called a fabricator, it's used to craft parts and tools from recycled/refined resources. In between the storage racks on the right, there's a grinder. If you click the green button, the grinder start spinning, and you can put those shattered plating pieces into it. This will recycle and extract resources from almost anything you throw in it. In the corner, is a researcher. It reverse-engineers things to make them into blueprint so you can craft them later on. For example, if you put a part you've never found before into the researcher, it will research it and consume the object, but you will permanently have it as a blueprint. The rest is fairly simple, just some more storage.
.
In your Haven module, you'll see a number of storage racks for various items, and you'll see a second cryopod as well. (You could even invite your friend to a cryopod and play together)
.
In your airlock module, you'll see some suit racks, and the airlock room. An airlock is designed to suck all the air out of the airlock room so that you can exit into space without wasting any air. You use the airlock by going inside, putting on your helmet, and going to the large green panel. Once you press F on it, it opens the airlock menu. There's a couple main things with an airlock. There's the door control, and the pressure control. When transferring through an airlock, you have to close both doors, and press the pressurize or depressurize button, (pressurize if going into base, depressurize if going out). Once the pressure has reached the intended level, you can open the door in the direction you were hoping to go, and travel there safely.